Learn to Sketch: Part 2
“This article provides three new sketching exercises, plus a three-step sketching approach, and mathematical rules that when followed produce realistic sketches.”
In Learn to Sketch: Part 1, I shared some thoughts about why I believe sketching is important for engineers, and I shared three exercises to start developing sketching skills. Those exercises were all centered on basic elements (lines, circles, and ellipses) and basic shapes (cylinders and cuboids).
In this article (Part 2), I share the three-step approach I use when sketching and four mathematical rules I follow to produce geometrically correct sketches (in theory at least). These steps and rules are at the root of why I believe engineers are particularly well-suited to produce good sketches. I’ll also share three challenging exercises that will help you develop your skills.
A systematic approach to sketching
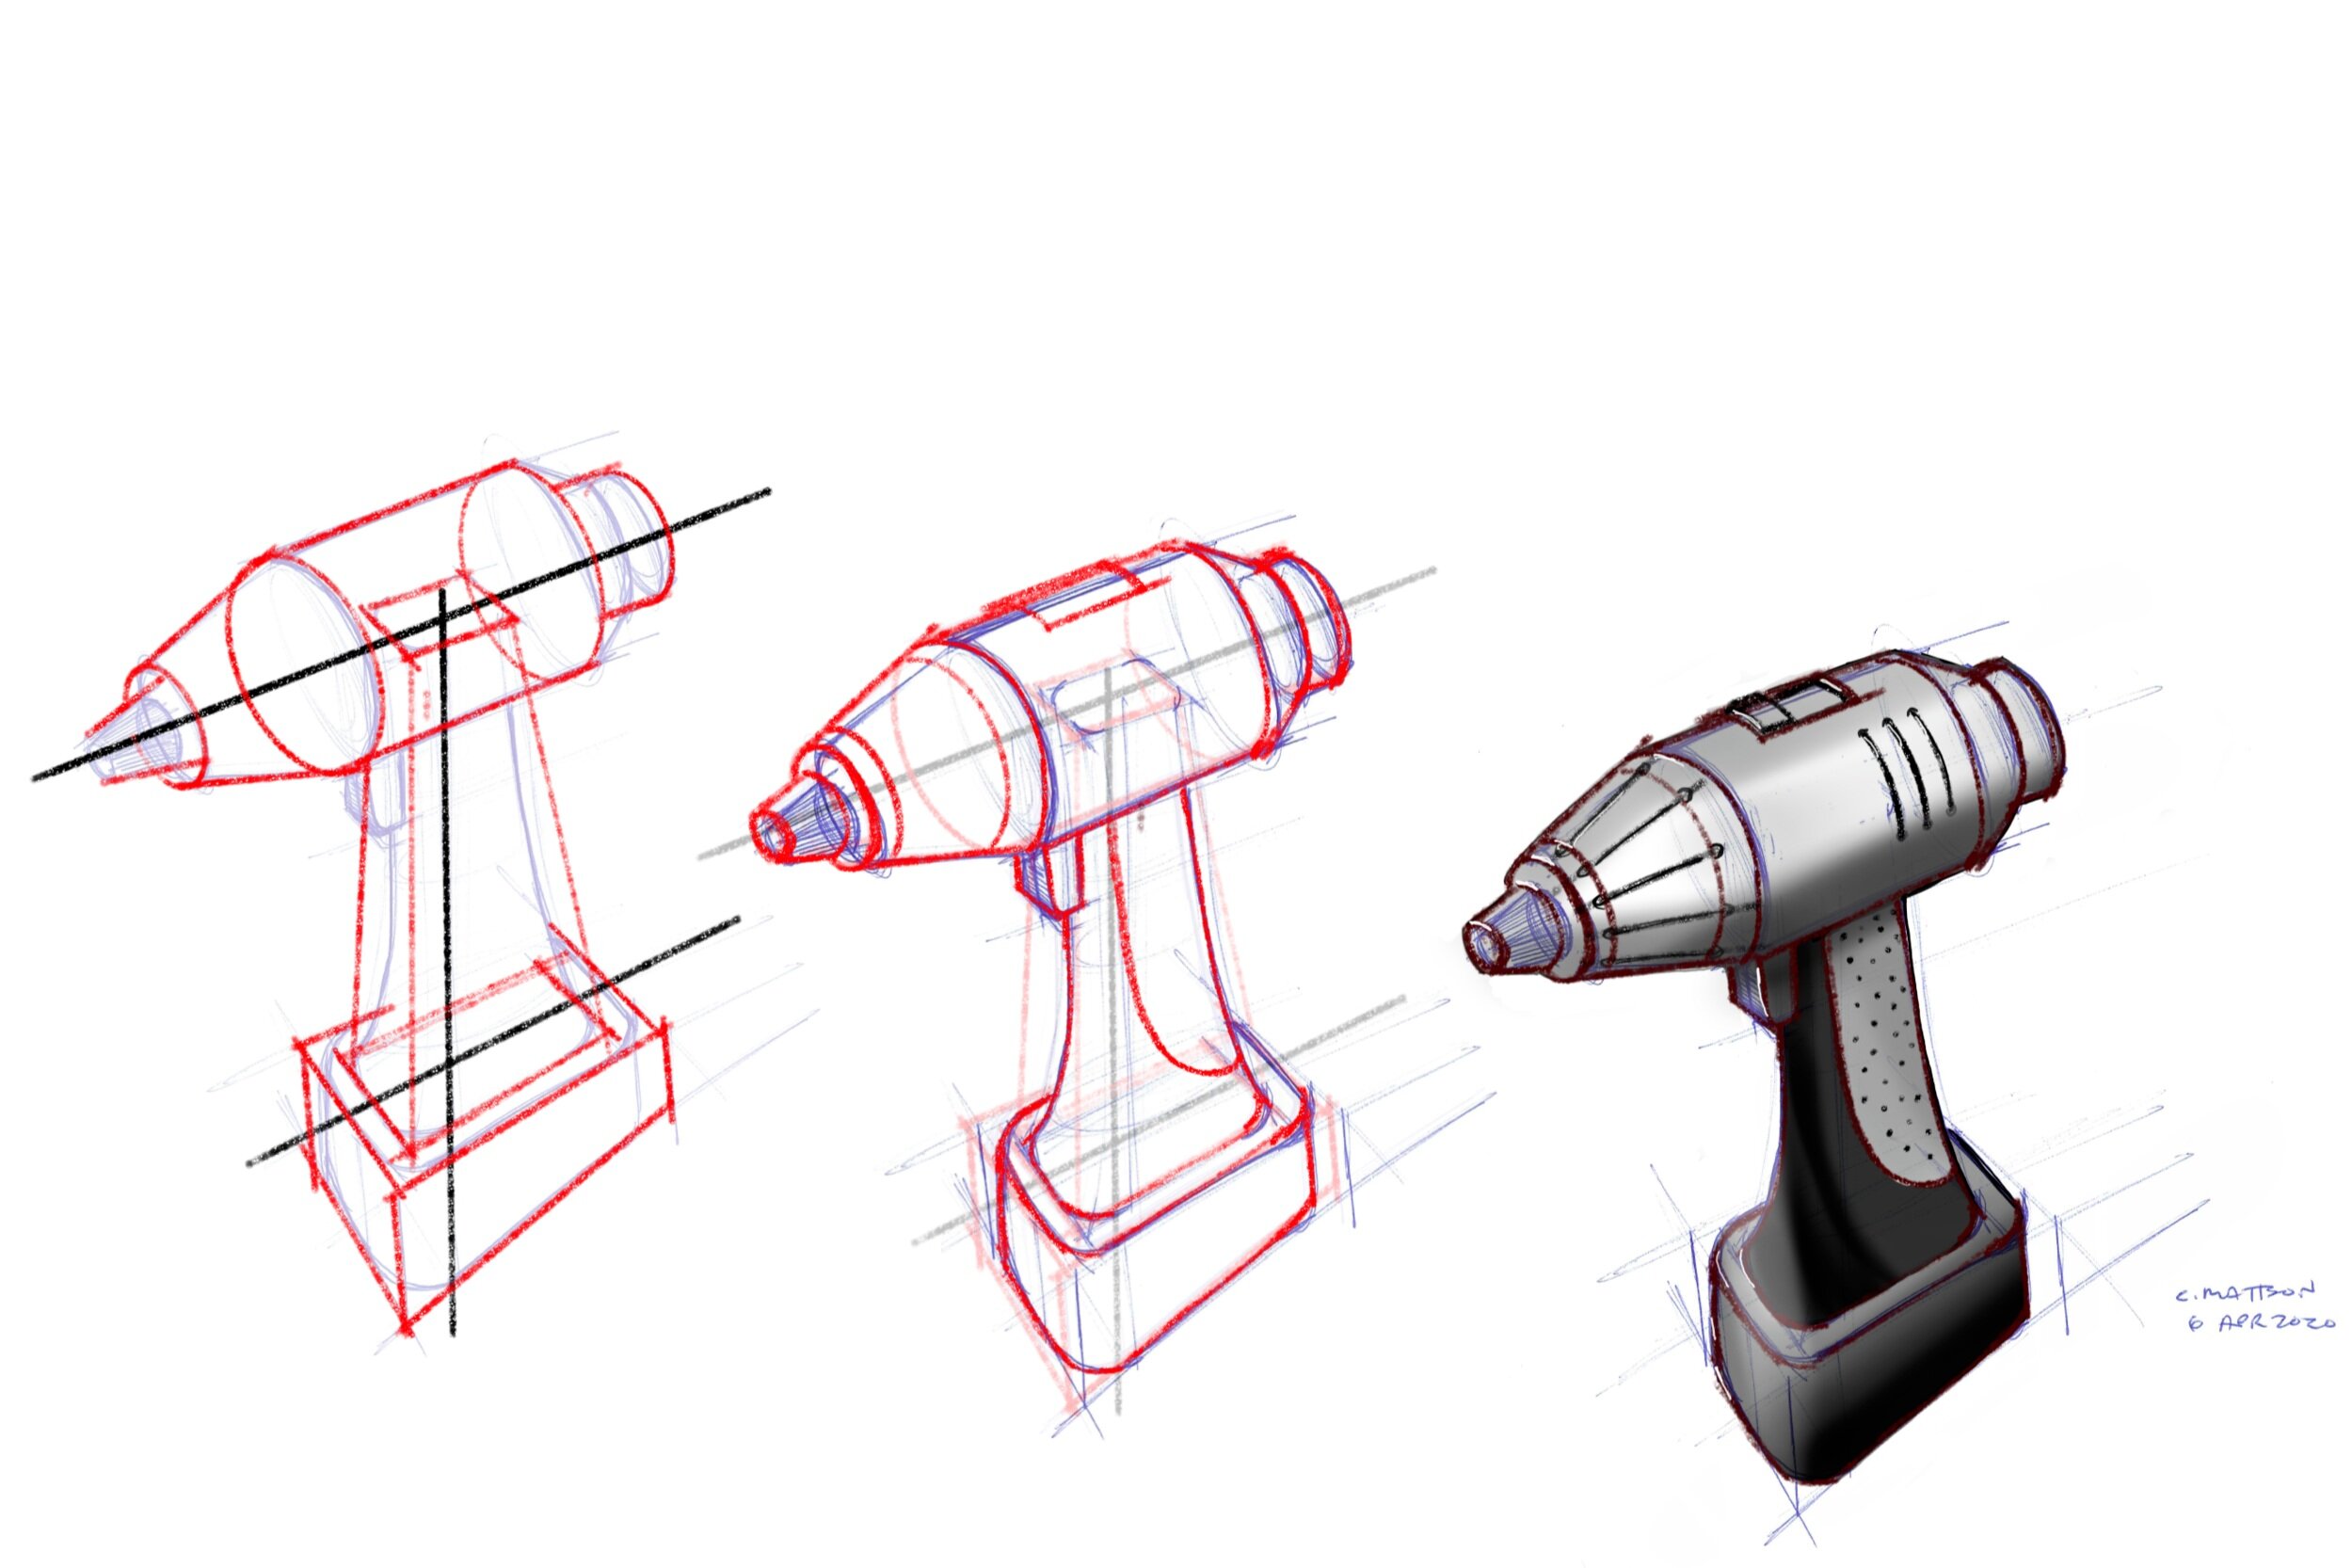
As engineers, we’re good at breaking complex problems down into smaller more manageable pieces. Sketching is no different. Paul Skaggs, BYU Industrial Design Professor, breaks down the complexities of sketching to three basic steps that resonate with me. Step 1: Form, Step 2: Divide, Step 3: Beautify. The figure below shows each step from left (form) to right (beautify). A ghost image of the final sketch is provided to help give context. The red lines represent each step.

For the Form step, the very basic shape or box enclosing the total volume is sketched lightly.
For Divide, additional basic shapes are lightly added to or subtracted from the form.
For Beautify, lines are darkened to show the final product shape. Contour lines are added to show non-planarity, shading is added to produce depth, and reflections are added to emphasize different material types. Also, details such as handgrips, air vents, etc. are added.
A few mathematical rules for sketching
I produce my best product/mechanical sketches when I am mathematical about how I’m approaching the Form step of sketching. I generally like to sketch in 2-point perspective, but to get it to look right, there are rules that must be followed. If you are unfamiliar with perspective sketching, the video at the end of this article will quickly show you everything you need. Here are just a few rules that I think about regularly when I’m sketching.
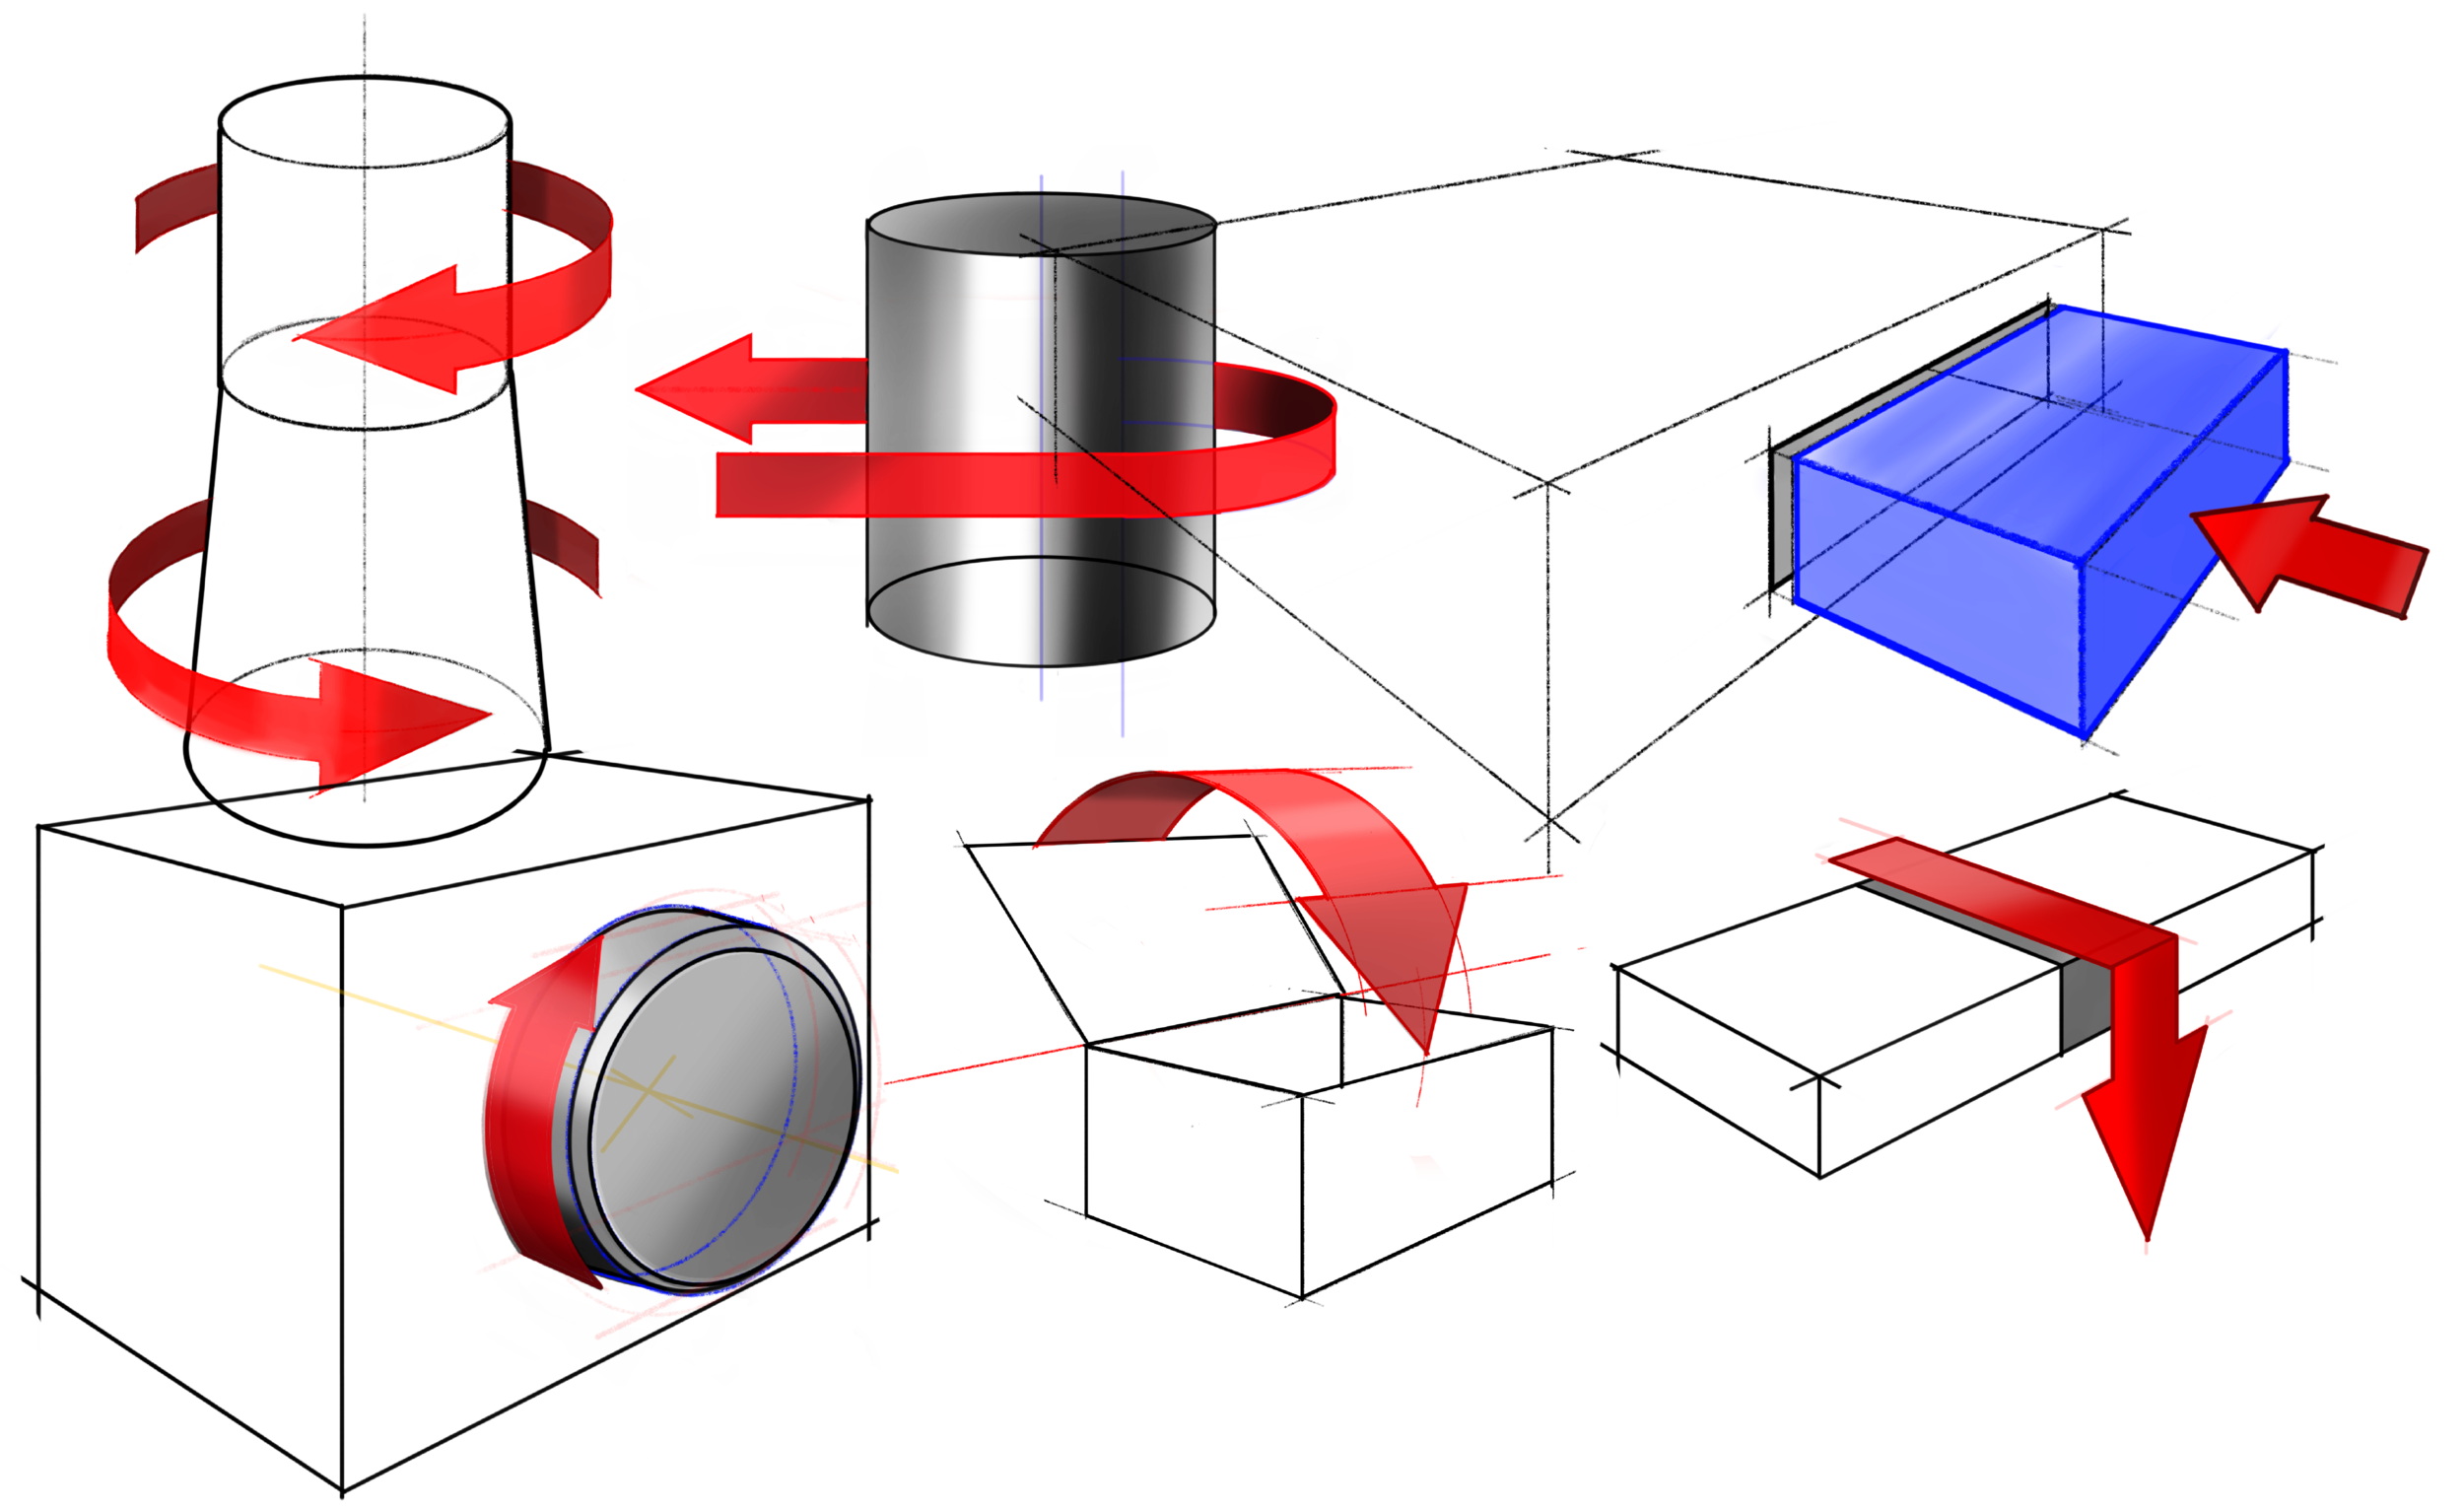
All vertical lines on a product sketched in 2-point perspective are shown as perfectly vertical
All horizontal lines on the side of a product are angled and meet at a vanishing point on the right side of the horizon.
All horizontal lines on the front of a product are angled and meet at the vanishing point on the left side of the horizon.
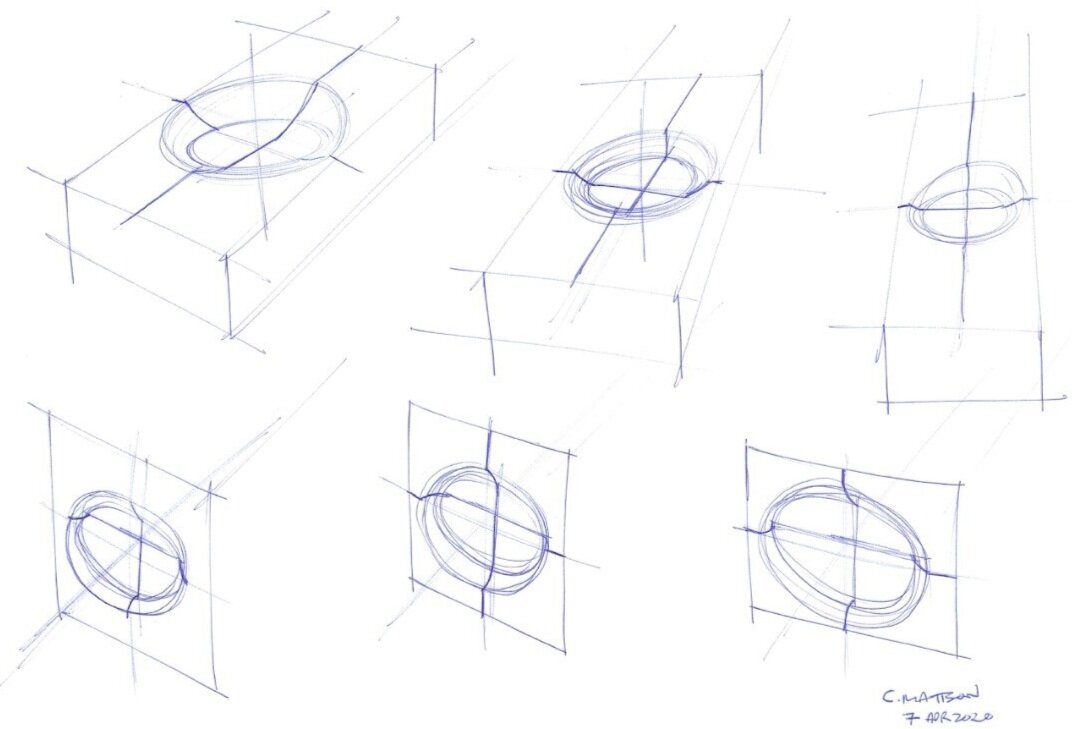
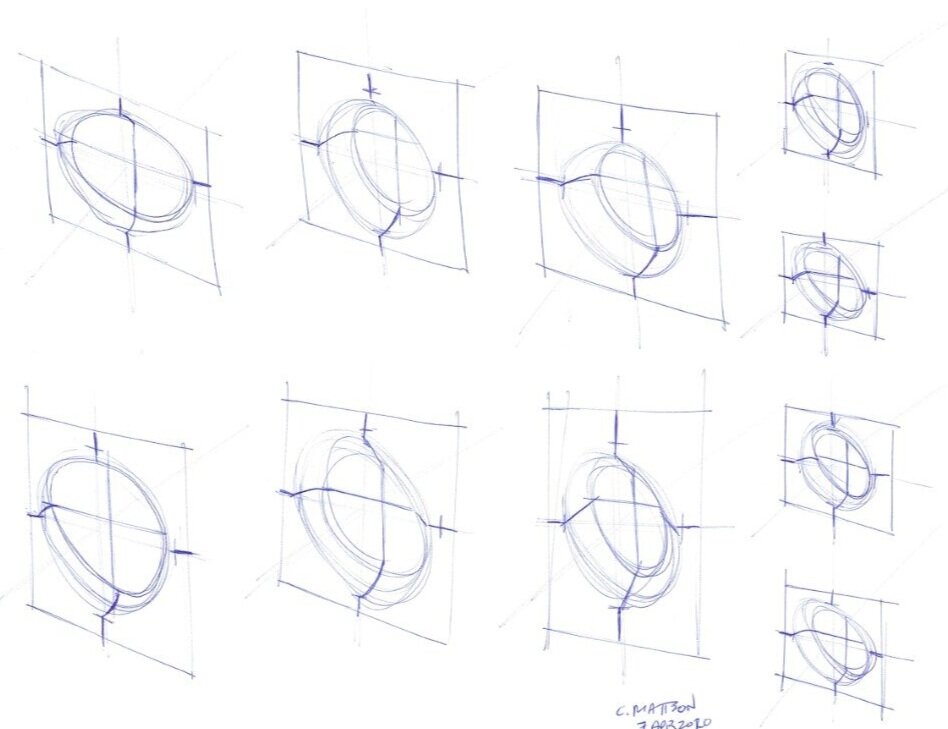
A circle drawn in perspective is an ellipse, and the minor axis of that ellipse is always lined up with the axis that would protrude perpendicularly from its center as shown below on the right side.
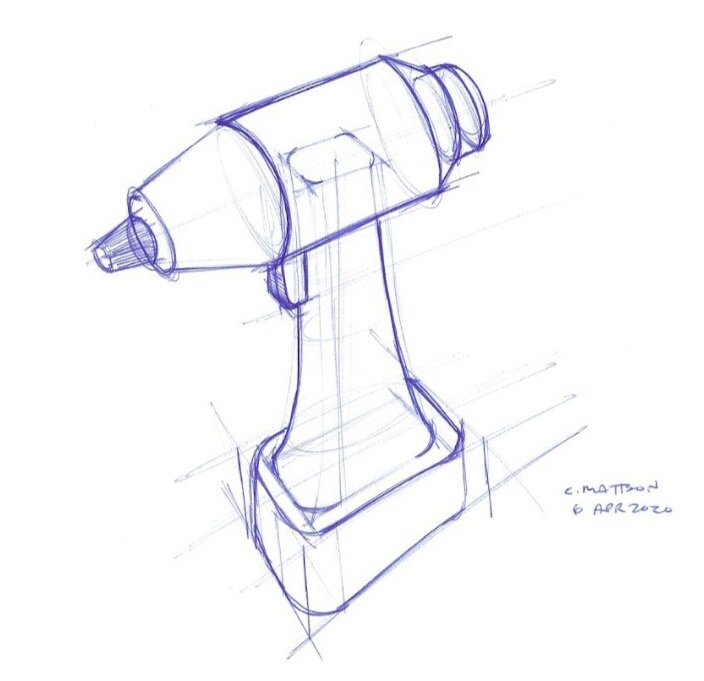
Using these rules, I formed the hand drill shown below by first sketching a box where the main barrel will fit. The way I sketched that box defines where the two vanishing points are. I often imagine vanishing points that are off the page. Note that the constructed box has a center-line that is also the center-line of the barrel (shown in blue).

Once I had the barrel location defined by its center-line, I established the handle location. For reference when making the rest of the sketch, I drew the center-line of the handle perfectly vertical, and I made it intersect the center-line of the barrel in a deliberate location. This is shown as a green dashed line. Lastly, I created a center-line for the battery (shown as a dashed red line). This center-line is deliberately angled so that it converges to the barrel center-line at the vanishing point on the right side of the horizon. These three center-lines are fundamental to the Form step and are shown as heavy dark lines in the sketches below. The sketches below represent the Divide and Beautify steps of the sketching process.

Sketching Exercises
As you do the following exercises, try to begin thinking about the Form-Divide-Beautify approach and 2-point perspective rules described above. The exercises below are numbered as a continuation to the exercises described in Learn to Sketch: Part 1.
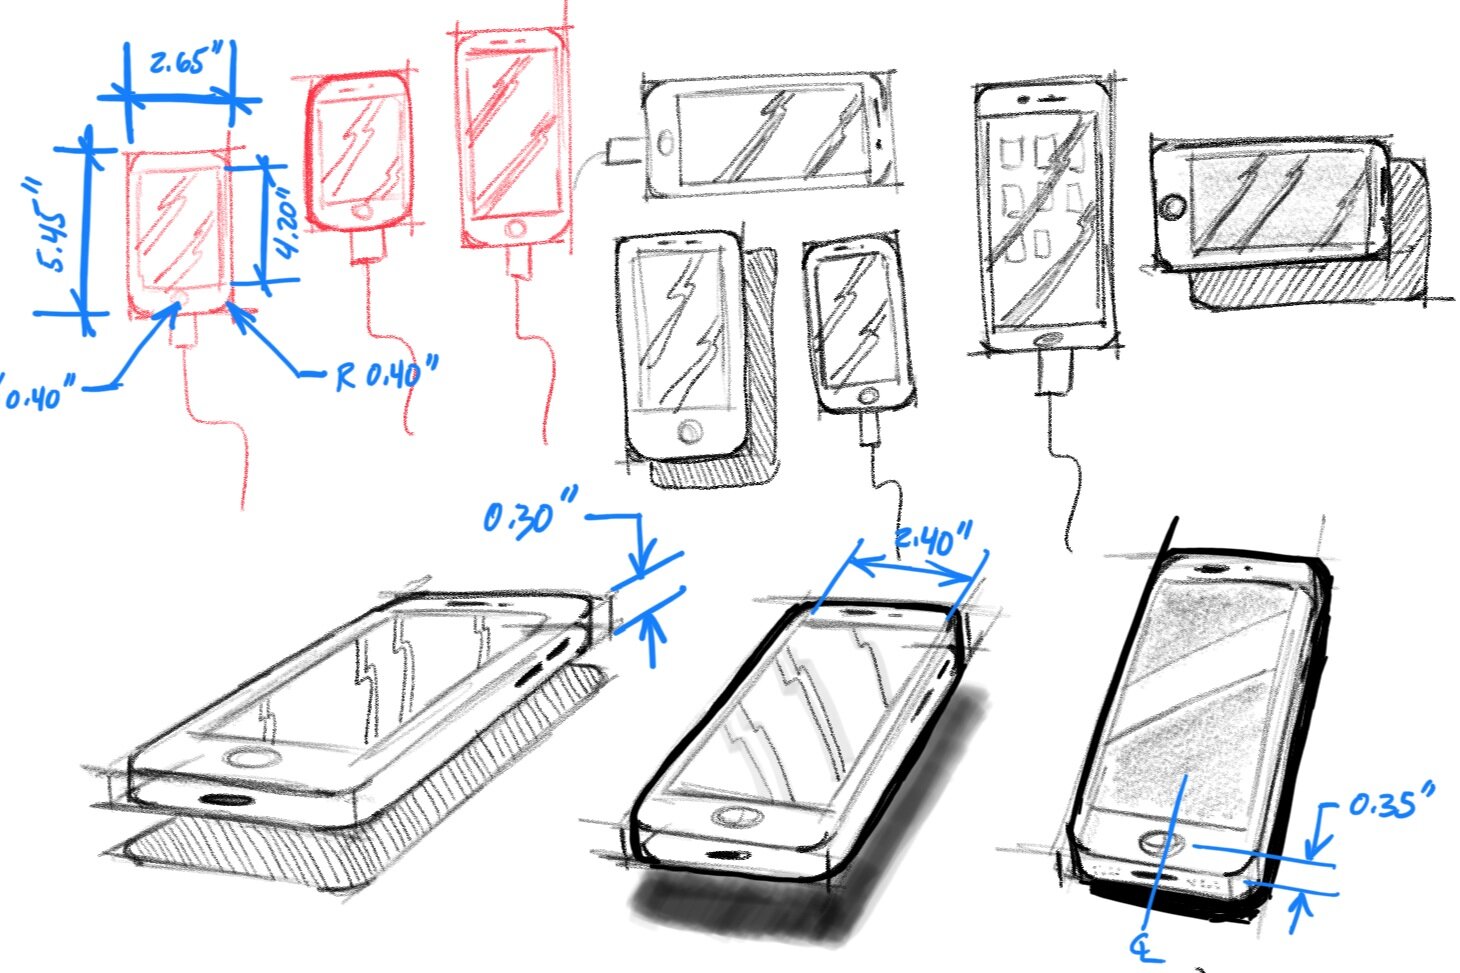
4.Mobile phone exercise
a) Warm-up for one minute by drawing straight lines in the top fifth of the paper. Try the dot-dot-line method so that you get a specific and deliberate line, as opposed to any random line.
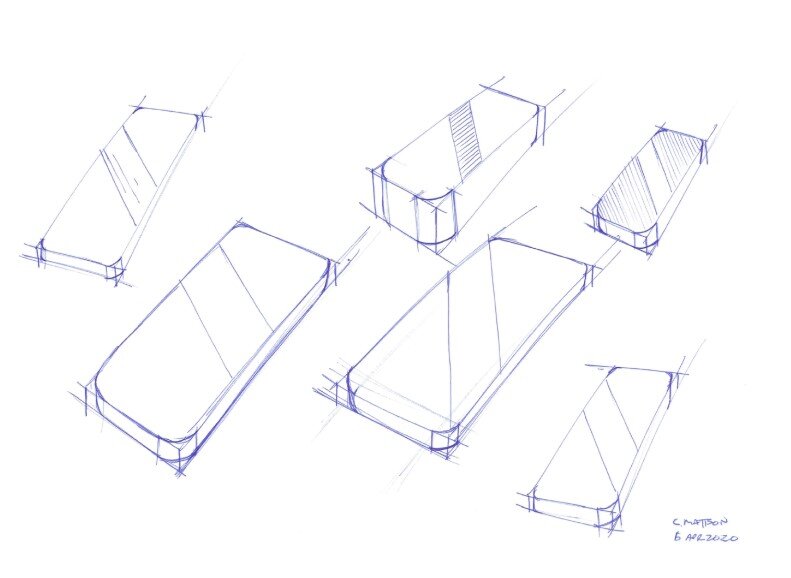
b) For four minutes draw 2D mobile phones or tablets. For a few put a reflection on the screen as shown. For at least one, draw a drop shadow (see my example, third from left). For at least one, try to draw an oval at the base of the phone; this will make the phone look like it is standing on end and the oval is the ground (see my example, fifth from the left).
c) For five minutes draw a mobile phone in 2-point perspective.
d) If you want to sketch for more than 10 minutes (or do this as an exercise of its own), examine your perspective-view sketch, identify weaknesses and practice as a way to improve. For example, in my perspective-view sketch, I was not happy about how the radiused corner at the bottom right of the phone looked, so I spent another 10 minutes making another page of mobile phone bodies to see if I could improve.

5. Washing machine exercise
a) Warm-up for one minute by drawing straight lines, circles, and ellipses in the top fifth of the paper. Try to draw specific and deliberate lines, circles and ellipses, as opposed to any random ones. For this exercise in particular, drawing a specific circle or ellipse in a specific place is not easy. It takes practice, so return to Exercise 3 (Ellipse Exercise from Part 1), on another day, as part of your exercise routine.
b) For four minutes draw 2D washing machines. Look at a photograph of a washing machine if you need to. For reflections on flat surfaces, draw straight lines, and for reflections on non-planar surfaces, draw curves, as shown.
c) For five minutes draw a washing machine in 2-point perspective.
d) If you want to sketch for more than 10 minutes, examine your perspective-view sketch, identify weaknesses and practice as a way to improve. For example, in my perspective-view sketch, I was unhappy with my work as I struggled to get the door to look right. So I spent another 10 minutes making two other washing machines to see if I could improve. Still unsatisfied, and on another day, I tried to two pages of door-like geometry. I still have progress to make (sigh).


6. Hand drill exercise
a) Warm up for one minute by drawing straight lines or other basic elements in the top fifth of the paper. Draw specific and deliberate elements, not random ones.
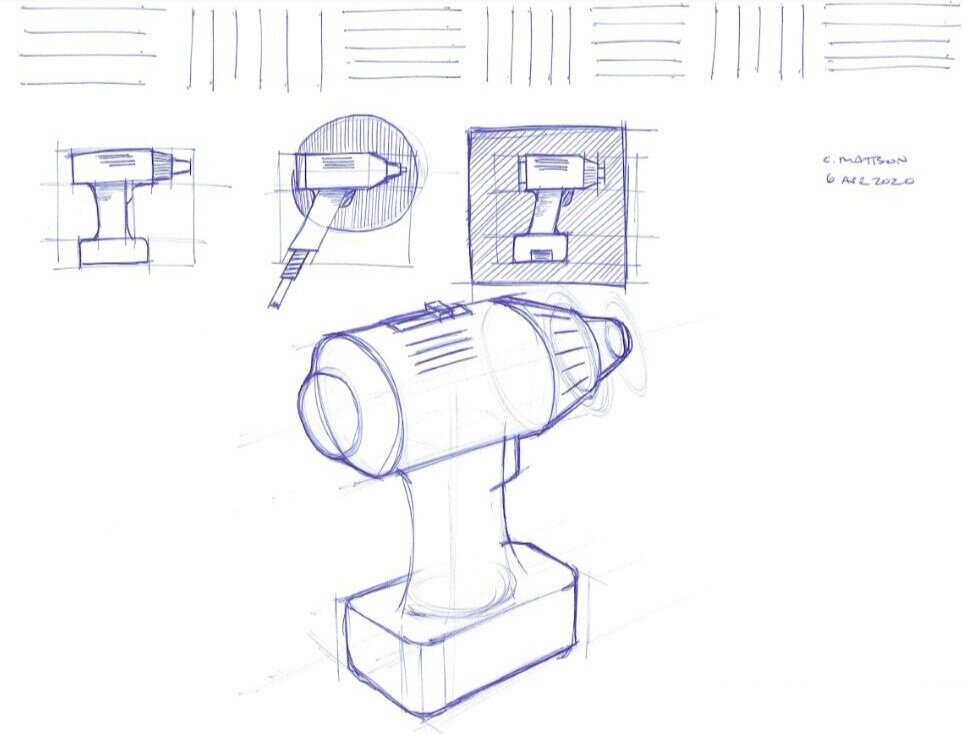
b) For four minutes draw 2D hand drills. Look at a photograph of drills if you need to. To give detail, add a grill for airflow (I did this with a few horizontal lines on the main barrel of the drill). To show depth add some shading right below the main barrel as shown. For at least one of your sketches try to put a shaded circle or square behind it. This is a simple way to highlight particular designs on a sheet of many designs, to make it more interesting.
c) For five minutes draw a hand drill in 2-point perspective.
d) If you want to sketch for more than 10 minutes, or do part (d) as an exercise of its own, examine your perspective-view sketch, identify weaknesses and practice as a way to improve. For example, in my perspective-view sketch, I didn’t really like the handle, and I didn’t like how the barrel, clutch, and chuck didn’t line up very well, so I spent another 10 minutes making another drill to see if I could improve.
To put these exercises into practice, try the routine below. If you need to or want to slow down a bit, return to the exercise routine in Learn to Sketch: Part 1.
Exercise Routine 2
Day 1: Do mobile phone exercise (parts a-c)
Day 2: Do mobile phone exercise (part d, or repeat parts a-c)
Day 3: Do washing machine exercise (parts a-c)
Day 4: Do washing exercise (part d, or repeat parts a-c)
Day 5: Return to Part 1 and repeat either Line exercise, circle exercise, or ellipse exercise, whichever you feel you need to work on.
Day 6: Do hand drill exercise (parts a-c)
Day 7: Do hand drill exercise (part d, or repeat parts a-c)
Day 8: Return to Part 1 and repeat either Line exercise, circle exercise, or ellipse exercise, whichever you feel you need to work on.
Day 9: Do mobile phone exercise (parts a-c) replacing a mobile phone with an 80’s boombox.
Day 10: Do washing machine exercise (parts a-c) replacing a washing machine with a sewing machine.
Day 11: Return to Part 1 and repeat either Line exercise, circle exercise, or ellipse exercise, whichever you feel you need to work on.
Day 12: Do drill exercise (parts a-c) replacing the drill with a DSLR camera.
Day 13: Repeat any of the exercises in this routine that you want to try again.
Day 14: Repeat any of the exercises in this routine that you want to try again.
Some additional help
Perspective Basics (it’s an excellent video)
Check out Part 3 or the rest of the Short Course on Sketching.
To cite this article:
Mattson, Chris. “Learn to Sketch: Part 2.” The BYU Design Review, 8 Apr. 2020, https://www.designreview.byu.edu/collections/learn-to-sketch-part-2.